Lab 8: PHP and MySQL
Create a database with two tables to store data
Use phpMyAdmin, to create a new MySQL database named lab8
Note: a users manual for MySQL is available online.
Use MySQL Manager to create two tables:
- the first table,
users, will need with four fields
- userid - the primary key as an INTEGER value, auto-incremented
- username - as a VARCHAR value (string) with the requrement that it be unique
- password - as a VARCHAR value (string), not null
- balance - as a REAL value (numeric), not null
- the second table,
wishlist, will also need four fields
- wishid - the primary key as an INTEGER, auto-increment
- userid - a INTEGER to identify the user, not null
- userid is considered a foreign key that maps to the
users table
- item - as a VARCHAR value (string), not null
- price - as a REAL value (numeric), not null
Add data to a database table
- Use phpMyAdmin to add three rows (records) to your
users table to act as registered users
- Since the userid is set to auto-increment, you should not specify a value when you create the row, allowing MySQL to automatically set its value to the next available integer
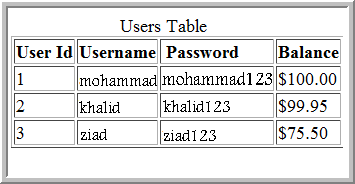
| userid | username | password | balance |
|---|
| 1 | mohammad | mohammad123 | 100.00 |
| 2 | khalid | khalid123 | 99.95 |
| 3 | ziad | ziad123 | 75.50 |
- Use phpMyAdmin to add six rows (records) to your
wishlist table to represent all wishes
| wishid | userid | item | price |
|---|
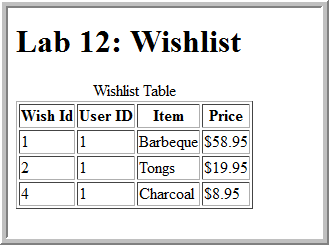
| 1 | 1 | Barbeque | 58.95 |
| 2 | 1 | Tongs | 19.95 |
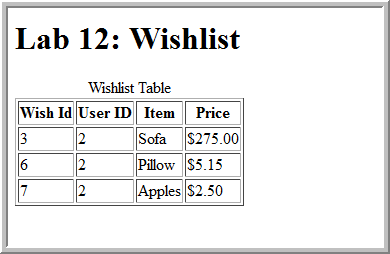
| 3 | 2 | Sofa | 275.00 |
| 4 | 1 | Charcoal | 8.95 |
| 5 | 3 | Frisbee | 6.95 |
| 6 | 2 | Pillow | 5.15 |
The table data says that userid 1 (mohammad) wishes to purchase a Barbeque at a price of $58.95, Tongs at a price of $19.95, and Charcoal at a price of $8.95
Use a SELECT statement to display table data
SQL tab in phpMyAdmin allows you to experiment with creating and debugging SQL statements that you can use in your PHP code.
- MySQL Manager's Execute SQL tab to select all the users
SELECT * FROM users- Click GO to execute the query
- Use the SQL tab to select all usernames with a balance over $80.00
SELECT username FROM users WHERE balance > 80.0
- Use the Execute SQL tab to select all the wishlist rows
- Use the Execute SQL tab to select all the items wished for by userid 1
- Use the Execute SQL tab to select all the items wished for by userid 2
- Use the Execute SQL tab to select all the items wished for by userid 3
- Use the Execute SQL tab to select all the items wished for by username mohammad
SELECT item FROM wishlist, users

WHERE users.username='mohammad' AND users.userid=wishlist.userid
- Use the Execute SQL tab to select all the items wished for by username khalid
Use PHP to display the users data as a HTML table
Create a php file named users.php that open the lab8 database, selects all the rows from the users table, and display the data in a HTML table

We can do this slowly and carefully, in stages.
- Create the PHP file,
users.php, with valid XHTML to display the <h1> and a one row <table> that consists of only a summary, caption, and a row of <th> elements
- Use Firefox's Web Developer toolbar to view the source code and validate it as legal XHTML 1.0 Strict
- You should not be using any PHP code yet, this comes in the next step
<h1>Lab 8: Users</h1>
<table border="1" summary="users table">
<caption>Users Table</caption>
<tr>
<th>User Id</th><th>Username</th><th>Password</th><th>Balance</th>
</tr>
</table>

- Add a PHP function,
getUsers() given below at the top of the users.php file to open the lab8 database, executes the SQL SELECT statement, and return a string containing the <tr> and <td> data
- Note: The sample code given below is incomplete, it returns a hardcoded string for debugging purposes. Get this working first.
<?php
function getUsers() {
// This file contains the database access information.
// This file also establishes a connection to MySQL
// and selects the database.
// Set the database access information as constants:
$dbhost = "localhost";
$dbuser = "root";
$dbpass = "";
$dbname = "lab8";
// Make the connection:
$conn = mysqli_connect($dbhost,$dbuser, $dbpass, $dbname);
if(!$conn ) {
die("Could not connect:".mysqli_connect_error());
}
// Write the SQL statement string to select all users
$sqlStatement = "SELECT * FROM users";
// Execute the SQL query
$rows = mysqli_query ($conn, $sqlStatement);
// Format the data as HTML <tr>, <td> elements
// TODO - hardcoded for debugging
// $tableRows = getUsersRows($rows);
$tableRows = "<tr>" .
"<td>1</td><td>mohammad</td><td>mohammad123</td><td>100.00</td>" .
"</tr>";
// Close the database connection. Optional. PHP will automatically close
// the connection when the script ends
mysqli_close($conn);
return $tableRows;
}
- Add the call to the php function
getUsers in your <table> body
<table border="1" summary="users table">
<caption>Users Table
</caption>
<tr>
<th>User Id
</th> ...
</tr>
<?php echo getUsers(); ? > // fix closing delimiter (remove space)
</table>
- Verify that debugging data is displayed as a table row. Use Firefox Web Developer Toolbar to view and validate the HTML code generated

- Add the PHP function to
getUsersRows shown below that accepts the results from the $rows passed in as the argument
function getUsersRows
($result)
{
$tableRows = "";
foreach ($result as $row)
{
$tableRows .= "<tr>\n" .
"<td>" . $row['userid'] . "</td>" .
"<td>" . $row['username'] . "</td>" .
"<td>" . $row['password'] . "</td>" .
"<td>" . "$" . number_format($row['balance'], 2) . "</td>" .
"</tr>";
}
return $tableRows;
}
- Fix the TODO section of function
getUsers() to remove the hard-coded table data, and uncomment the line before it to set $tableRows to the value returned from getUsersRows()

Write the HTML and PHP code to display the wishlist data
Based on the code for users.php, add another page named wishlist.php, and add the HTML and PHP code to display the wishlist data in a HTML table for a particular user ID.
For example, where userid=1

Verify that your Wishlist table works when you change the userid to 2 and 3
Write the HTML and PHP to display the a user's wishlist data
Add a third page lab8.php, that contains a HTML form that allows the user to enter their userid.The form's action attribute value should be a call to wishlist.php that receives the userid through the $_POST array and displays the corresponding wishlist for that user.


Verify that your form works when you change the userid to 1 and 3


